
DIY Bandsaw Blade Sharpening
You just put that new blade on your bandsaw last week and you’ve decided to resaw some lumber you’re reclaiming for a new project. Everything is humming along swimmingly when suddenly, there’s a series of sparks, and another, then another before you’ve finished the cut. Nails! The scourge of any saw blade intended for cutting wood.
During the next cut there are no nails encountered, but the cutting rate has slowed somewhat and there’s a little more heat on the finished cut.
Bandsaw blades dull. Sometimes faster than others, depending on the material you are cutting, even if there are no nails or other foreign objects involved. Woods with a lot of pitch, dense hardwoods, frozen wood (it happens!) some wood is even more abrasive than others.
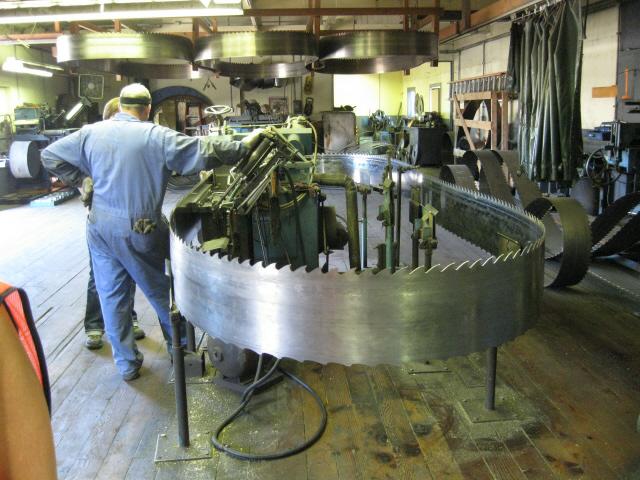
It doesn’t take much to ruin a perfectly good band, and anyone can see it’s got a ton of teeth. If you’ve got a 10′ band at 6 TPI, that’s about 600 teeth to sharpen. So one rule of thumb to consider would be that coarser blades with larger, fewer teeth probably make more sense to sharpen than those with smaller, finer teeth which are far more time consuming not to mention hard on your eyes and your body.
Sharpening Options
There are two basic ways to sharpen bandsaw blades, mechanically, with the use of a machine, or machines designed to sharpen and reset bands, and manually, with the use of hand tools, or hand power tools. Done correctly, by hand or machine, you can typically get 4-5 sharpening out of a single band before the tooth geometry changes significantly. One might think that the time required to resharpen dull blades might be a false economy or a lost cause, but with a little practice and the right techniques that work for you, it can be quite quick and save a lot of money.
Mechanical or machine sharpeners can be pricey to acquire, but if you’ve got 30 or 40 dull bands hanging around and/or you do any kind of production sawing, especially resawing, it might make sense. On a onesy-twosy basis, buying a dedicated sharpener and the resetter that usually goes along with it doesn’t really make sense. You can buy an awful lot of new blades for the same money.
Most of the stand alone sharpeners are designed for portable sawmill bands and larger 1″ ~ 4″ resaw bands. There’s a couple out there that can accommodate bands as narrow as 5/8″, but any way you rip it, you’re looking at a couple of thousand dollars for both.
However, in the spirit of D-I-Ying, it is possible to hand sharpen your bandsaw blades with either simple hand tools or hand held power tools.
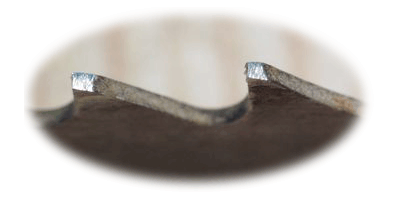
Anatomy Of A Blade
The basic anatomy of any tooth on any wood cutting saw blade is pretty much the same, be it a circular saw blade, a jig saw blade, or in this case, a bandsaw blade.
For the accompanying image we can see the various parts that make up the cutting edge of a blade.
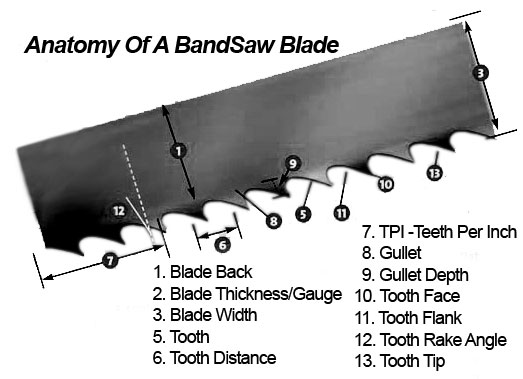
For our purposes we are going to be concerned with the TIP, the FACE and the FLANK of the teeth. These are the parts which do the actual cutting. The GULLET of the blade is important in that it is what removes the chips and sawdust from the cut, keeping the way clear for the teeth. When performing a sharpening, check the gullets for sap and other foreign debris buildup, remove and clean accordingly.
The TIPS Of The Teeth.
When the band is running on the saw, all of the tooth tips should be in alignment. That is to say they should all have the same distance from the back edge of the blade and strike the material at the same point.
This should be the first order of business in a sharpening job. This can be done with the blade on the bandsaw. One effective method of doing this is to hold a sharpening stone up against the toothed edge while moving the blade backwards by hand. Make sure the stone sits perpendicular to the bandsaw table and parallel to the teeth. Touch the stone ever so lightly against the teeth and listen for a consistent sound, without any ‘missing’ as the blade tips touch against the stone. That will dress the cutting TIPS of the blade.
The FACE and FLANK Of The Tooth.
The FACE of the tooth are those portions on either side of the tooth just back from the tip. They usually run from just behind the tooth tip to a point where the face disappears behind the set of the teeth in front and behind. The cutting edge of the tooth FACE is the edge that is on the inside of the gullet, not the FLANK or trailing edge of the tooth. The main purpose of the tooth FLANK is to support the thinner cutting edge FACE against the pressures of cutting. It also aids in dissipating the heat to help keep the blade sharp.
When you are sharpening any tool, bandsaw blades, circular blades, even axe blades, it is important to try and maintain the integrity of the blades original edges without changing the angles or geometry. When sharpening by hand, while you have care and patience on your side, you also have to reply on good tools and a good eye to keep things straight.
Five Point Sharpening
Sometimes when you are sharpening, you will only need to address portions of the band that have been dulled through encounters with foreign, non-wood objects. Other times you’ll want to grab one of your favourite bevvies, hunker down and do the whole blade. In either case, there are very specific areas to pay attention to.
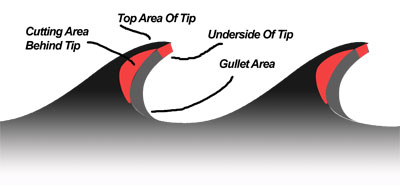
When sharpening a bandsaw blade there are five parts of the cutting edge that need to be addressed. The first is the outside edge of the tip, as described above. Then there’s the underside of the tip, to the point where it joins the gullet, and each side of the tip and finally, the gullet itself.
Hand Sharpening Tools
We’ve already mentioned the sharpening stone method for squaring the cutting edge of the tip. In addition, you’ll need a flat-edged tool for grinding or filing the cutting faces of the tip, plus a cylindrical grinding or filing tool to sharpen the underside of the tooth tip, and the gullet area. Both of these operations can be done with flat and round hand files, some people have even adapted chainsaw filing jigs to accommodate their bandsaw blades. If you use hand files, make sure that the round one you choose (for the gullets), fits or matches the shape of the existing gullet. You can also use the round chainsaw files to dress the underside of the tip as well. When using the round file don’t forget to twist it slowly as you also move forward.
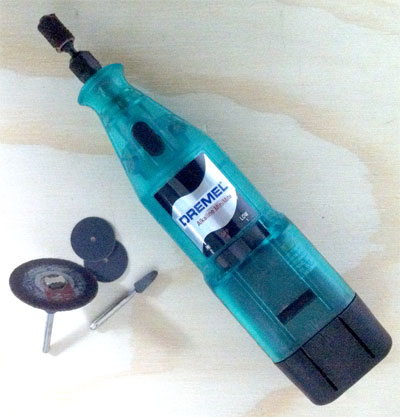 On a more powerful and efficient note, using a small hand held pencil grinder, Dremel™ tool, or flexible shaft tool, can speed up the process considerably once you get the hang of it. Dremel™ and similar tools have a plethora of bits and abrasives to choose from. They are relatively inexpensive and you’ll definitely find one to do this job.
Once you’ve got your tooling together, the next thing is to determine how to secure the blade so you can actually work on it. Some users suggest leaving the blade in the saw (disconnect the power, of course), while others remove the bands and have a simple, homemade jig to hold the blade during sharpening. Either way, keeping the blade in position will allow you to use both hands; One for the tool, the other as a rest or steady.
Quick And Dirty Or Complete Resharpening
Depending on the blade and your sawing regimen, sometimes you only need to sharpen the tip and the outside faces of the cutting edges. Other times you’ll want to sharpen the whole blade, tooth-by-tooth, cleaning up the gullet and the underside of the tip. Dressing the gullet with a cylindrical abrasive can maintain the gullet geometry and remove any build up to ensure smooth chip and sawdust removal.
Safety First
Before you proceed, please consider the following safety recommendations:
- Wear gloves – As dull as it is, the blade is still sharp enough to do some damage.
- Wear eye protection – The bits being removed may be small, but your eyes are still no match for steel.
- Wear a dusk mask – A respirator works too, but a simple dust mask will keep you from breathing in the metal dust and the other contaminants that are also removed in the process.
- Unplug the saw. If you perform these operations on the blade while it is still on the saw, you know what’ll happen if it starts accidentally. Switching off is fine, but unplugging is cheap insurance.
- Another good tip is to put a thin strip of wood or soft plastic on the table that the blade can bite into while you are holding it for sharpening.
- Use good lighting and get a chair or stool to sit on, this takes some concentration and the ability to sit for a period of time. You also want to have your eyes inline with the work area.
Whether you sharpen the blade on or off the saw, the process is the same so it can often come down to what you’re more comfortable with.
Step One – The Back Of The Tip
Although you may have already run the sharpening stone against the topside of the tooth, you will still want to hit each one briefly with a file or a Dremel™ tool, at a slight, backwards angle from the top of the tip, to expose new metal not just on the very top, but down the backside of the tooth, towards the gullet, as well.
Step Two – The Underside Of The Tip
Once you’ve done the back and top of the tip, you need to do the underside as well. If you’re using files, this is where you want to find a round file —or a small 1/2 round— that can keep to the curves of the tooth. If possible, you should file with the set. Meaning, if you are sharpening a tooth that sets to the right, start from the left side and go across, to the right. This will better maintain the set.
If you are using a Dremel™ or other tool with an abrasive, if you can find a small, appropriately sized sanding drum, that would work well. You can also use a small mounted point or even the edge of a larger, grinding disk. Don’t let it linger and remember, it doesn’t take much —just a touch! Two or three small contacts are better than one long one.
Step Three – Cutting Area Behind The Tip.
This refers to both outside edges of the gullet, just below the tip. The edges of these areas is feathered from the thicker middle of the tooth to the thinner, inside edge of the gullet. The science is that the tip of the tooth digs in, followed by the cutting edges just behind it. These can be dressed either with the round file, a half round file, or the Dremel™ bit.
Step Four – The Gullet Area
Typically, you will probably not need to address the gullet unless you have sharpened the band to such a point that there is a change in the gullet depth and the tooth rake angle. Some materials can leave residue on the blade, including the gullet. This can be removed either with a little solvent during the sharpening process or by using a small wire brush on the Dremel™ tool. Keeping the gullet clear and gum-free will increase blade life and make for smoother cutting.
If you do dress the gullet area, keep the edges of it flat and perpendicular to the sides of the band. This will maintain optimum chip removal.
Resharpening bandsaw blades is not for everyone. It’s time consuming, and simpler to just get another band. However, you know Murphy! You’re into that project, it’s well past the retail hour and you have that nail encounter. Armed with this information, have a look around the shop and you’ll likely find the tools you need to get things up and running smoothly, again.

The best and most sensible advise I have read. Thank you.
LikeLike
We are interested in purchasing tool sharpening equipment for our sawmill facility. Please contact me by email and i can provide detail on the size of double bands we need to sharpen.
thank you
LikeLike
Hello Mark, Thank you for interest I have forwarded your contact information off to our account sales team. If you have any questions please fee free to contact us or visit our website http://www.kmstools.com
Cheers,
Chris Campbell
LikeLike
For most of the woodworkers it is not so easy to work with a rusty saw blade. You did a great job. Thanks for this valuable article.
LikeLike